Pay in installments of $6.09 with
![]() ,
,
![]() and
and
![]()
Shipping Estimate
USA
- USA
- CAN
- USA
- CAN
Ships within 48 hours · Estimated delivery Jul 1 - Jul 6
For Your Every Summer RSVP, with Code: SUMMER15
Description
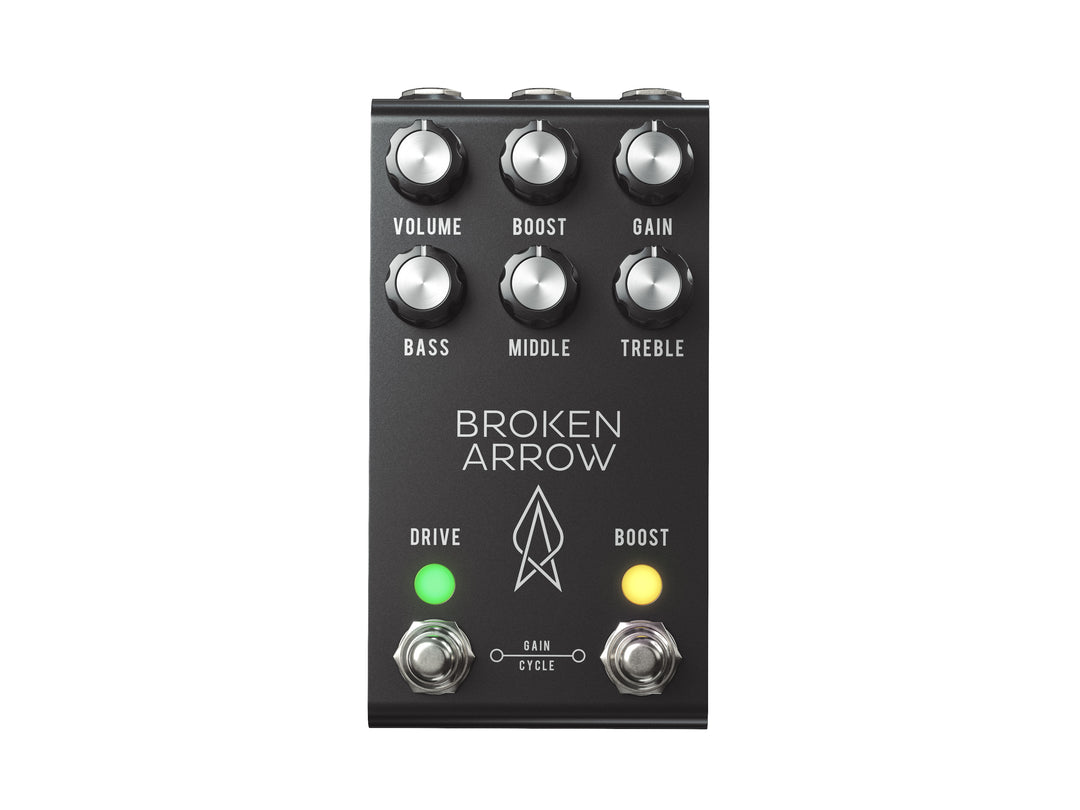
broken arrow pedal BROKEN ARROW v2BROKEN ARROW v2 MIDI BROKEN ARROW OVERVIEW The BROKEN ARROW is a very flexible overdrive with 4 presets for clipping options, an innovative gain adjustment feature that we call GAIN CYCLE, and a 3 band active EQ for maximum tonal flexibility. To top it off, we added a boost circuit which is the same type of MOSFET boost circuit found on our top selling PRISM Preamp pedal. BOOST OVERVIEW The boost circuit is in its own true bypass loop which means it
BROKEN ARROW v2 - MIDI
|
|
|
BROKEN ARROW OVERVIEW
The BROKEN ARROW is a very flexible overdrive with 4 presets for clipping options, an innovative gain adjustment feature that we call GAIN CYCLE, and a 3 band active EQ for maximum tonal flexibility. To top it off, we added a boost circuit which is the same type of MOSFET boost circuit found on our top selling PRISM Preamp pedal.
BOOST OVERVIEW
The boost circuit is in its own true bypass loop which means it can be used independently of the DRIVE circuit. The boost circuit in the BROKEN ARROW is a MOSFET based boost much like the AMP MODE found in our best selling PRISM Preamp pedal. To activate/deactivate the boost circuit simply press the BOOST footswitch.
One of the things that makes the boost in the BROKEN ARROW different from other boosts on the market is that it has 4 presets available. Each preset is EQ’d slightly differently to allow it to alter how it interacts with the overdrive circuit in the BROKEN ARROW or any other pedal you may have in your rig
|
Preset 1 – YELLOW LED: Bright Boost. Very useful for creating a thinner sound or when boosting a thick sounding overdrive.
Preset 2 – GREEN LED: Mid Boost. Not as thin as the yellow mode, the green mode allows more lows and takes on the character of a mid boost. Preset 3 – AQUA LED: Tailored Boost. Most people will find this a perfect setting that will complement most any overdrive setting in the BROKEN ARROW. Preset 4 – BLUE LED: Full Range. No tonal coloring here! Just your guitars natural tone! To select a boost preset, press and hold the BOOST footswitch for more than 1 second and boost program mode will become active. When in this mode, the BOOST led will flash to indicate that you are in program mode. A quick tap on the BOOST footswitch will cycle the boost presets and you’ll be able to hear these presets change as you cycle through them, assuming that the boost circuit was active when the boost program mode was entered. Once you arrive at a boost preset that you want to use, press and hold the BOOST footswitch for more than 1 second and boost program mode will exit. |
|
EASTER EGG! There is an easter egg in the boost circuit of the BROKEN ARROW! The boost circuit is based on a MOSFET transistor which is a very popular type of transistor to use for boost circuits because it has many “amp like” characteristics when it clips etc. There can be downsides to this circuit though.
Several very popular MOSFET boost circuits on the market have a very noticeable crackle when their boost knobs are rotated. We fixed this issue in the BROKEN ARROW and our boost is perfectly silent when the boost knob is rotated. The only downside to our fix of this problem is that we lose about 5% of the gain at the highest rotation setting. To most people this would never be a problem as the boost on the BROKEN ARROW is crushingly loud as it it. However if you are a purist, or you just want to hear the difference, I have good news for you. We included an internal jumper that you can move to go back to stock MOSFET boost operation with 100% gain and all the crackle your heart could ever desire! Quiet or Crackle. The choice is yours! STND BOOST – Our version of the MOSFET boost. Same tone, no noise. ALT BOOST – Modified version of the MOSFET boost. Same tone, slightly more gain, crackles when you turn the knob. |
OVERDRIVE OVERVIEW
The overdrive circuit of the BROKEN ARROW is a soft clipping overdrive circuit designed in the same vein as the venerable TS-808. The distinction between the TS-808 and the BROKEN ARROW being that there is no set “mid-hump” in the BROKEN ARROW and the tone is relatively flat when all controls are set at 12:00. Given that the BROKEN ARROW features an active 3 band EQ, there was no need to force a mid bump unnecessarily as a mid bump is easily achieved by increasing the MID knob.
The overdrive portion of the BROKEN ARROW is a completely new way of using and adjusting overdrive! With 4 clipping diode presets and our innovative GAIN CYCLE feature, the BROKEN ARROW will make most other overdrive pedals obsolete!
CLIPPING DIODE PRESETS
The BROKEN ARROW allows for 4 different presets of clipping diodes which themselves drastically alter the tone and feel of the way the overdrive clips and distorts.
To select a clipping preset, press and hold the DRIVE footswitch for more than 1 second and the clipping program mode will become active. When in this mode, the DRIVE led will flash to indicate that you are in program mode. A quick tap on the DRIVE footswitch will cycle the clipping presets and you’ll be able to hear these presets change as you cycle through them, assuming that the drive circuit was active when the clipping program mode was entered. Once you arrive at a clipping preset that you want to use, press and hold the DRIVE footswitch for more than 1 second and clipping program mode will exit.
|
Preset 1 – GREEN: Classic Screamer. Two symmetrical silicon diodes give the classic drive and compression that the Tube Screamer is known for. Preset 2 – MAGENTA: Asymmetric Clipping. Three asymmetric silicon diodes will clip the top and bottom portions of your guitars waveform differently resulting in a more complex and interesting tone. This sounds great when laying down aggressive rhythm parts! Preset 3 – BLUE: Symmetrical Clipping. Four symmetric silicon diodes will clip the top and bottom portions of your guitars waveform evenly which gives a more focused and direct tone. One notable pedal that uses this style of clipping is the Timmy. Preset 4 – AMBER: Vintage Marshall. Two RED LED’s are used to symmetrically clip the top and bottom portions of your guitars waveform evenly. The LED’s allow MUCH higher headroom so your tone will stay more open and less compressed much like a vintage Marshall. |
Changing clipping diodes are a great way to radically change how an overdrive pedal sounds and feels but oftentimes the change that you perceive has more to do with a change in volume than an actual change in tone….until now!
When we were designing the BROKEN ARROW we knew we wanted to give the overdrive section a lot of tonal flexibility and most importantly make that flexibility useful on stage. So when changing clipping diodes we included circuitry that level matches the output of the pedal as various clipping diodes are selected. So now you can select between all four clipping options, and your volume level will remain constant. More importantly, the difference that you hear between the clipping modes will be because of the difference in how those clipping diodes sound and not because your volume is jumping all over the place as it does with other designs.
GAIN CYCLE
The most exciting feature of the BROKEN ARROW is the new feature that we developed called GAIN CYCLE. GAIN CYCLE takes the GAIN knob setting, which selects your maximum gain, and divides that level of gain into 4 equal parts. Say for instance you have your GAIN knob set at the maximum setting or in other words, 100% gain. Every time you press both footswitches simultaneously, the gain of the pedal will jump up 25% until you get to 100%. The following press after 100% will cause the gain cycle to start again at 25%.
|
My goal with the GAIN CYCLE feature is to allow guitarists to easily ramp their gain up without having to bend down and change it or try to adjust it with the edge of their foot while playing live. Here’s a perfect use case! Let’s assume the GAIN control is set to 100% Verse 1 – Gain cycle set at 25% – Slightly overdriven edge of breakup tone. Press GAIN CYCLE Chorus – Gain cycle set at 50% – Distinct overdriven tone. Press GAIN CYCLE Bridge – Gain cycle set at 75% – Heavy overdrive tone. Press GAIN CYCLE Solo – Gain cycle set at 100% – Heavily saturated overdriven tone! TIP: Add the BOOST to push the overdrive even harder for endless sustain! It’s important to remember that GAIN CYCLE setting #4 (100%) will be as much gain as you have the GAIN knob set for. Think of the GAIN knob on the BROKEN ARROW as your maximum gain with each GAIN CYCLE setting being a percentage of that maximum value. |
The brightness of the DRIVE led will change to let you know which percentage of gain you have selected. The higher the percentage, the brighter the DRIVE led. For instance:
GAIN CYCLE #1 – DIM LED – 25% of GAIN knob value.
GAIN CYCLE #2 – BRIGHTER LED – 50% of GAIN knob value.
GAIN CYCLE #3 – BRIGHT LED – 75% of GAIN knob value.
GAIN CYCLE #4 – VERY BRIGHT LED – 100% of GAIN knob value.
3-BAND ACTIVE EQ
To top it off, the DRIVE circuit of the BROKEN ARROW has a 3 band active EQ. The EQ circuit features a studio grade EQ that gives tremendous tonal flexibility to the BROKEN ARROW. Based on the legendary Baxandall EQ that is featured in countless studio EQ’s, the BROKEN ARROW EQ takes this circuit and tailors it for guitarists! We spent tons of time on this EQ dialing it in so it would hit all the frequencies that guitarists need to adjust, and then sweetened it by removing the ear fatiguing highs and lows that can appear at extreme settings.
EQUALIZER CIRCUIT FEATURES:
Studio-grade EQ with High Bandwidth and Flat Response at 12:00
+/- 12dB Boost/Cut per control
Center Detents on the pots that make it easier to get back to a neutral or flat response.
MIDI – NEW FOR 2020!
Since the BROKEN ARROW first came out, we have received many requests from our players saying that adding MIDI to the BROKEN ARROW would make it the perfect overdrive and we completely agree! As always, we take player feedback as a primary driver of product development and we are very proud to announce that the most flexible overdrive on the market just got better with the addition of MIDI!
CABLE INFORMATION: In order to use MIDI on the BROKEN ARROW v2, you will need a cable that converts a MIDI (DIN-5) connector to a TRS cable. This is the cable that we have used with great success and can't recommend it enough.
https://www.disasterareadesigns.com/shop/p/5p-trs-pro-midi-cable
For those building their own cables, the BROKEN ARROW v2 receives MIDI information via the RING connection on a TRS (Tip, Ring, and Sleeve) connector.
Check out this link for some detailed wiring: https://www.midi.org/articles-old/trs-specification-adopted-and-released
MIDI CHANNEL
By default, the BROKEN ARROW v2 ships with MIDI Channel 1 being the selected channel. This can be changed by pressing and holding the DRIVE footswitch while applying power to the BROKEN ARROW. Press the BOOST footswitch to increment the MIDI channel number.
You’ll notice that as you continue to hold the DRIVE footswitch, the BOOST LED will flash to indicate which MIDI channel you have selected. IE – 7 flashes = MIDI Channel 7. After the LED flashes, we inserted a 2-second pause so you could tell when the LED was finished flashing. The LED will continue flashing as long as you are holding down the DRIVE footswitch. Once you have selected the MIDI channel you want and have verified it by counting the flashes, simply release the DRIVE footswitch and the pedal will save this MIDI Channel to the internal EEPROM on the microprocessor and reboot.
MIDI DETAILS
Accessing the new MIDI features of the BROKEN ARROW is done by Control Changes. Below is a list of the features of the BROKEN ARROW that can be accessed via MIDI as well as how to access them.
CC #1 – DRIVE ON/OFF (value of 127 = ON /value of 0 = OFF)
CC #2 – BOOST ON/OFF (value of 127 = ON /value of 0 = OFF)
CC #3 – CLIPPING DIODES
(value of 1 = 2x SYMETRICAL DIODES)
(value of 2 = 3x ASYMETRICAL DIODES)
(value of 3 = 4x SYMETRICAL DIODES)
(value of 4 = 2x SYMETRICAL RED LED's)
CC #4 – GAIN CYCLE
(value of 1 = 25% GAIN)
(value of 2 = 50% GAIN)
(value of 3 = 75% GAIN)
(value of 4 = 100% GAIN)
CC #5 – BOOST EQ
(value of 1 = BRIGHT BOOST)
(value of 2 = MID BOOST)
(value of 3 = TAILORED BOOST)
(value of 4 = FULL BOOST)
VOLUMEActs as a master volume for the overdrive circuit. BOOSTSets the amount of boost when the BOOST footswitch is engaged. GAINSets the maximum gain for the overdrive circuit. |
BASSThe 12:00 position is totally flat with +/-12dB boost/cut on either side of center. MIDDLEThe 12:00 position is totally flat with +/-12dB boost/cut on either side of center. The mid frequency is centered around 660hz. TREBLEThe 12:00 position is totally flat with +/-12dB boost/cut on either side of center. |
TECHNICAL SPECS
- Input Impedance: 1M
- Output Impedance: 100k
- Power Supply: DC
- Voltage Input: 9V MAX
- Polarity: Center Negative
- Min. Current Required: 150mA
- Dimensions: 2.7” x 4.875″
Shipping Notes
- Free Standard Shipping on $100+ Orders to the USA.
- Except Preorder products are shipped in 48 hours.
- Delivery to the USA:
- Standard Shipping : 3-10 business days
- If time is of the essence, please consider selecting expedited delivery for faster service.
Exchange/Return Notes
- We offer a 30-day return/exchange service after receiving.
- Final sale items are not eligible for returns or exchanges.
- To process your return/exchange, please contact us at [email protected]
- Please click here for more details>>> Return & Exchange Policy